How Proper Window Well Installation Can Prevent Basement Flooding

Your basement is more than just an extra space in your home—it could hold a playroom, cozy living area, gym, or even a home office. But as a homeowner, protecting this valuable part of your house against water damage and flooding is critical. One of the most overlooked lines of defence? Properly installed window wells.
This blog will explain the role of window wells in safeguarding your basement, the risks of improper installation, and, most importantly, how you can install them correctly. With this guide, you’ll empower yourself to protect your home from costly flooding issues efficiently.
What Are Window Wells and How Do They Work?
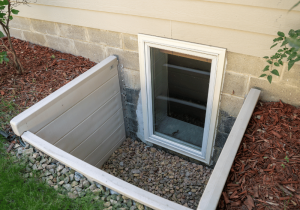
Window wells are semi-circular, reinforced barriers installed around basement windows. They’re designed to achieve two primary purposes:
 Flood Prevention
By directing water away from your windows, window wells limit water seepage and prevent leaks that could result in flooding.
- Natural Light and Ventilation
Window wells also allow natural light to enter your basement and improve air circulation while maintaining a protective barrier from debris and soil.
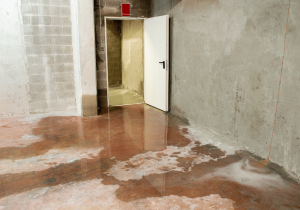
The Risks of Improper Window Well Installation
Improperly installed or low-quality window wells can create more harm than good. Here are some key consequences of poor window well installation:
- Basement Flooding
Without proper drainage, water can pool around the basement window, seeping into your home.
- Foundation Damage
Water pooling can damage the structural integrity of your home’s foundation over time.
- Mold and Mildew
Small leaks caused by poor installation can result in moisture buildup, leading to mold and mildew growth, which impacts air quality and increases health risks.
- Added Repair Costs
Fixing water damage can be incredibly costly compared to investing in proper window well installation upfront.
The good news? A correct installation significantly minimizes these risks, making your basement safer and your wallet happier.
Step-by-Step Guide to Proper Window Well Installation
Installing window wells isn’t just for contractors—experienced DIY homeowners can manage this task with the right tools and knowledge. Here’s a comprehensive guide:
1. Measuring and Planning
Start by measuring the width and height of your basement window. Then purchase a window well slightly larger than your measurements to ensure sufficient coverage. It’s also essential to plan where the well will sit in relation to your home’s foundation.
Pro Tip
Choose a window well with built-in drainage functionality for added protection.
2. Digging and Preparation
- Start by marking the area around the window. Ensure the space is about 6 inches larger than your window well in all directions.
- Dig down approximately 6–8 inches deeper than the base of the well. You’ll also need to ensure the gravel base will align below the window frame.
Key Note
Wear safety gloves and goggles while digging to avoid debris-related injuries.
3. Installing the Well
Position the window well against the foundation wall, ensuring it aligns evenly with the window frame. Secure the well:
- Drill holes into the foundation using a masonry bit.
- Attach the well to the wall using the appropriate screws or anchors.
Ensure everything is snug, as loose fittings can create gaps for water to enter the foundation.
4. Drainage and Gravel
For proper drainage, create a gravel base at least 6-8 inches deep at the bottom of the well. Gravel helps with water absorption and directs it away from the window. If your property is prone to heavy rainfall or poor drainage, consider connecting your window well to a drainage pipe.
Don’t Skimp!
Using high-quality gravel ensures better drainage over time and reduces risk.
5. Sealing and Finishing
- Seal the edges of the well tightly with weather-resistant caulk to prevent water leaks and debris buildup.
- If desired, install a window well cover to block out leaves, dirt, and excessive rainfall while still allowing light to pass through.
Maintenance Tips for Keeping Your Window Wells in Top Shape
 After installation, maintaining your window wells ensures they continue to function effectively. Follow these tips to keep them in excellent condition:
- Regular Cleaning
Remove debris such as leaves, twigs, and dirt to prevent clogging the well or drainage system.
- Inspect Seals
Look for cracks or gaps in the caulking, especially after winter when freeze-thaw cycles can damage the seals.
- Check for Water Pooling
After heavy rain, verify that the well drains water appropriately. If water pooling occurs, consider adjusting the gravel or drainage pipe.
- Use a Cover
A high-quality window well cover can reduce the need for frequent cleaning by keeping debris and moisture out.
Properly installed and maintained window wells are an essential shield against the risks of basement flooding and water damage. By taking these steps, you can enjoy peace of mind, knowing your basement is well-protected from the elements.
If you’re investing time or planning a DIY installation, keep this guide handy to get it right the first time. For those who prefer expert help, consider consulting a professional to ensure the job is done efficiently. Your basement deserves to stay dry and safe—starting with the right window well installation.